
I always feel like.....somebody's watching me....
We live in a heavily populated suburb. This means I have the favorable amenities of city life, but I also have to deal with being able to reach out and touch my next door neighbors' windows from the comfort of my own home, should I feel so inclined. That is certainly not cool with me.
Since I can't exactly move my house or the neighbors', I've decided I can do the next best thing and opt for privacy film on the windows with the most exposure. Immediately after moving in, I did put privacy film on the windows of my front and side entry doors. I just found it really weird that anyone standing on my porch could get a full view to the interior of my house. Recently, we decided to do the same thing on the dining room windows. I hardly ever raise the blinds in there because I would be staring directly into the neighbor's dining room. And because those windows get the best sunlight (and I wanted to acquire a Fiddle Leaf Fig tree more on that later), I figured something drastic needed to be done. Enter privacy film....
Or, better yet, my more affordable option for privacy film.
Because that film can be so stinking expensive, I decided to opt for the next best thing. I remember hearing a few years before we bought our house that clear contact paper could be used as privacy film for a mere $5 or so per roll. Check out the tutorial below.
Materials needed:
Clear Contact Paper
Measuring Tape
Scissors
Glass Cleaner
Xacto Knife, optional
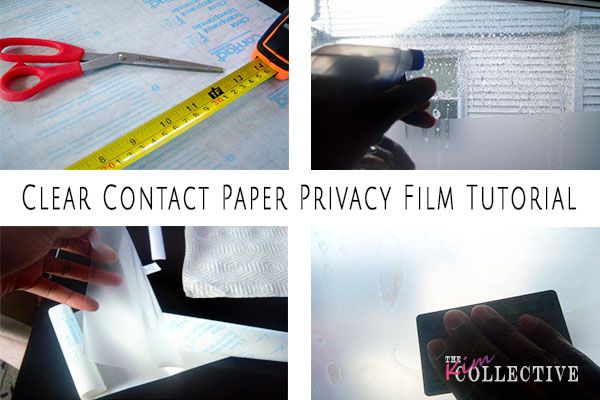
- Measure the opening you wish to cover
- Cut the contact paper to size. If you cut it a little on the larger side, an Xacto knife can be used to cut away the excess once it's adhered to the window.
- Remove the white grid paper backing from the contact paper.
- Spray the window liberally with glass cleaner. And I mean liberally. Feel free to put down some towels to catch the excess glass cleaner.
- Position the contact paper (sticky side facing the glass) on the window.
- Though contact paper is re-positionable, the glass cleaner allows you to easily move the contact paper around to get it in the desired position.
- Once the position is chosen, use a straightedge (or an old hotel room key, as shown) to scrape the excess moisture from behind the contact paper.
Now enjoy the bright sunshiny day without fear that your neighbors will see you in your skivvies!

No comments:
Post a Comment